This guide is for you if

Use this guide if you start, write, submit, manage, or report on a grant project.

Before you begin

Have your invitation email, your club information, project dates, budget details, and supporting files ready.

How to use it

Complete the tasks in order. Open a task to see the instructions. Select any screenshot to enlarge it.

Important: Stop if the district or foundation name is wrong.

Understand the two timelines

A Grant Cycle can close while its awarded projects continue. Projects and reports remain available until Project closeout.

Grant Cycle

One application opportunity, including its application dates, review, and award decisions.

Project Period

The dates when an awarded project is expected to begin and end. It may continue after the Grant Cycle closes.

Reporting Schedule

The progress and final reports required for an awarded project, with their due dates.

Project closeout

The final checks that formally complete an awarded project after its required reports are accepted.

1

Sign in

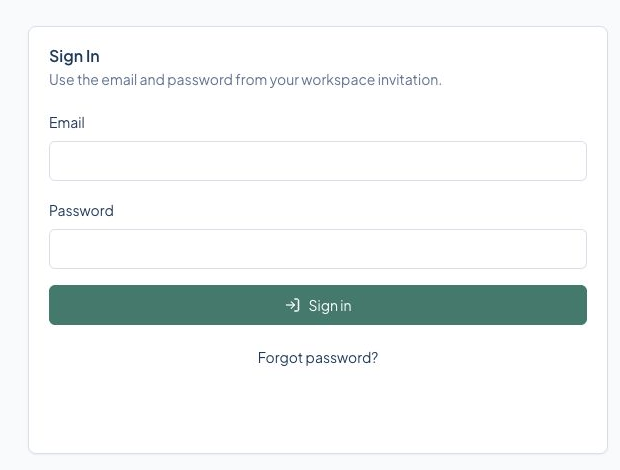
Start on the GrantsPost sign-in page.

Where to beginStart on the GrantsPost sign-in page.
  1. Enter the email address from your invitation.
  2. Enter your password.
  3. Select Sign in. If you cannot remember your password, select Forgot password?
GrantsPost screen for Sign in

Select the screen to enlarge it. Example data is fictional.

You are finished when

You arrive at the home page for your assigned role.

What happens next

GrantsPost opens the home page for your assigned role.

If something is not working

Check that you used the email address from the invitation. Use Forgot password? before asking an administrator to resend access.

2

Open the public application page

Open the application link sent by your district.
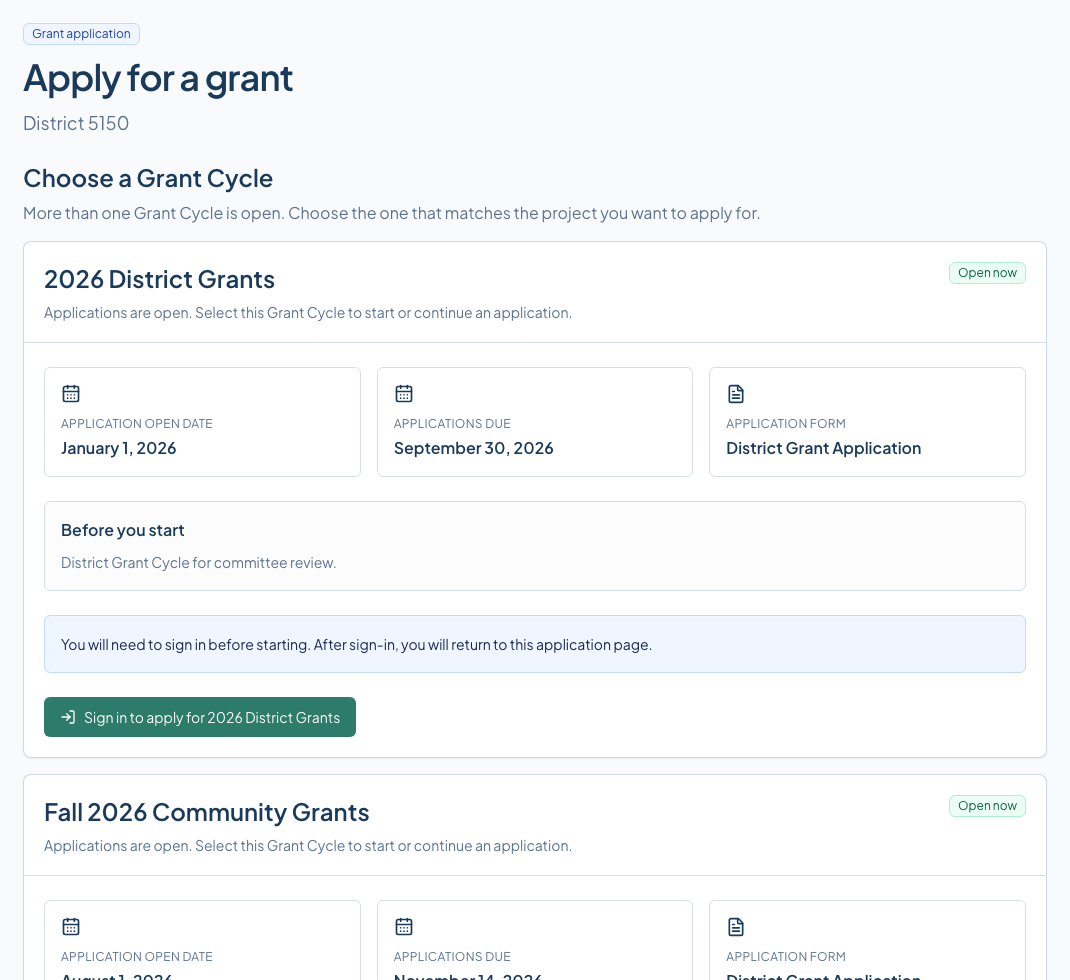
Where to beginOpen the application link sent by your district.
  1. Review every open Grant Cycle. Choose the one that matches the project you want to apply for.
  2. Confirm its deadline and eligibility information. Select Sign in to apply for [Grant Cycle name]. If you are already signed in, select Apply for [Grant Cycle name].
  3. Choose your club. Request an unlisted club only if it is not already available.
GrantsPost screen for Open the public application page

Select the screen to enlarge it. Example data is fictional.

You are finished when

You are signed in and associated with the correct applicant organization.

What happens next

Return to your role's home page and follow the next action shown by GrantsPost.

If something is not working

Use Help or Ask for help. Include the page name and what you were trying to do. Never send your password.

3

Use Your Projects as the home page

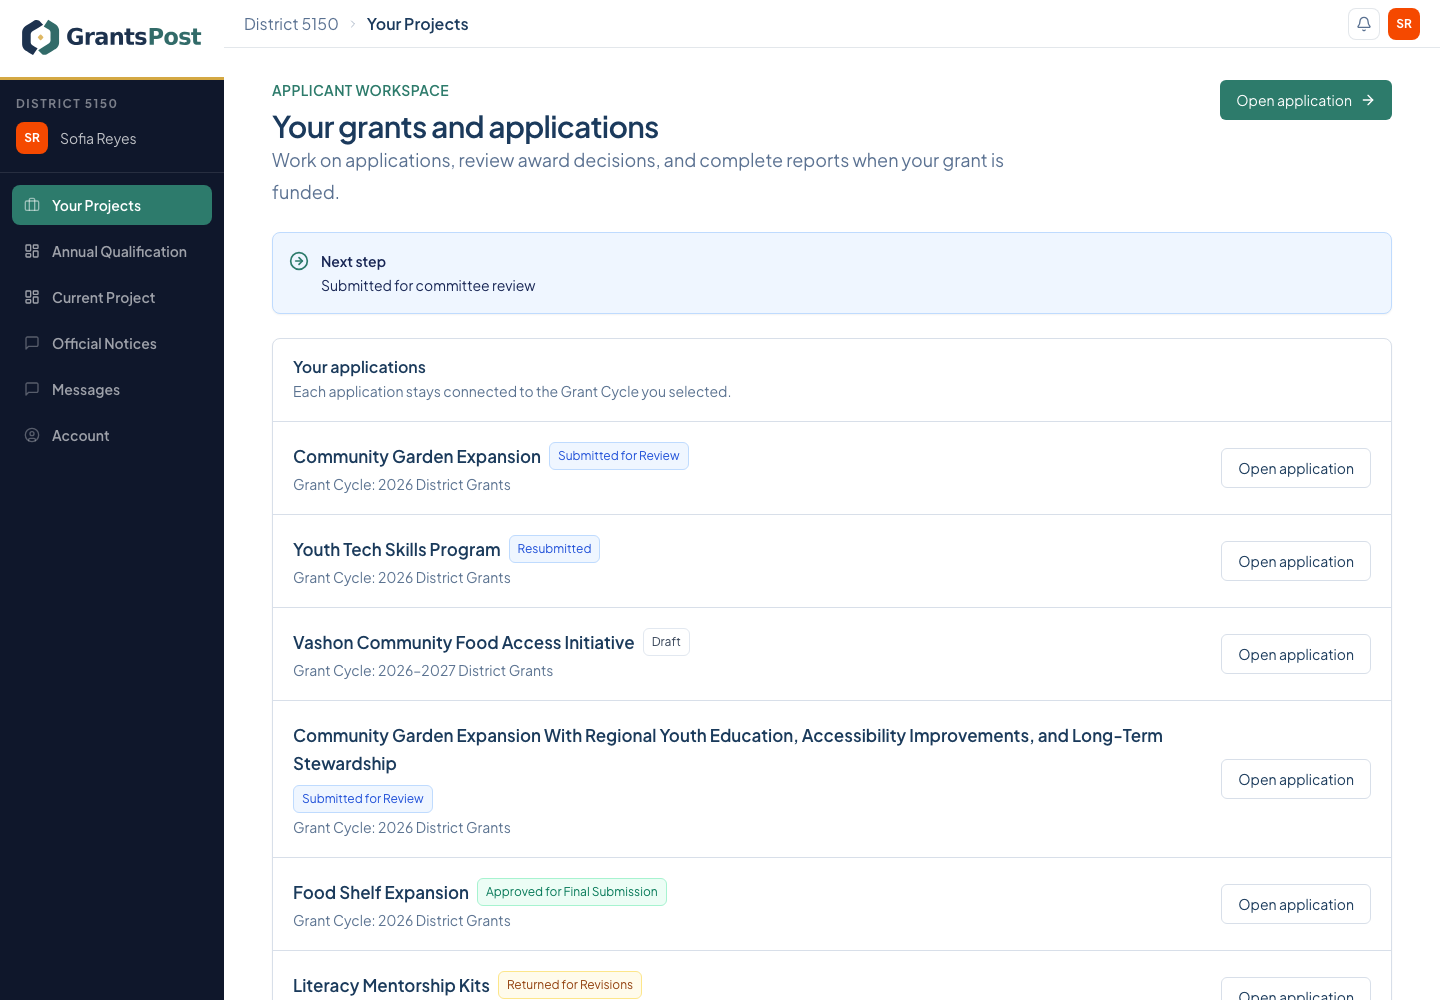
After signing in, open Your Projects.

Where to beginAfter signing in, open Your Projects.
  1. Read the Next step message near the top of the page.
  2. Open the project or report named in that message.
  3. Use the status on each project card to tell whether you need to act or wait.
GrantsPost screen for Use Your Projects as the home page

Select the screen to enlarge it. Example data is fictional.

You are finished when

You know exactly which project or report to open next.

What happens next

Return to your role's home page and follow the next action shown by GrantsPost.

If something is not working

Use Help or Ask for help. Include the page name and what you were trying to do. Never send your password.

4

Start the project

From Your Projects, open the project that needs attention.
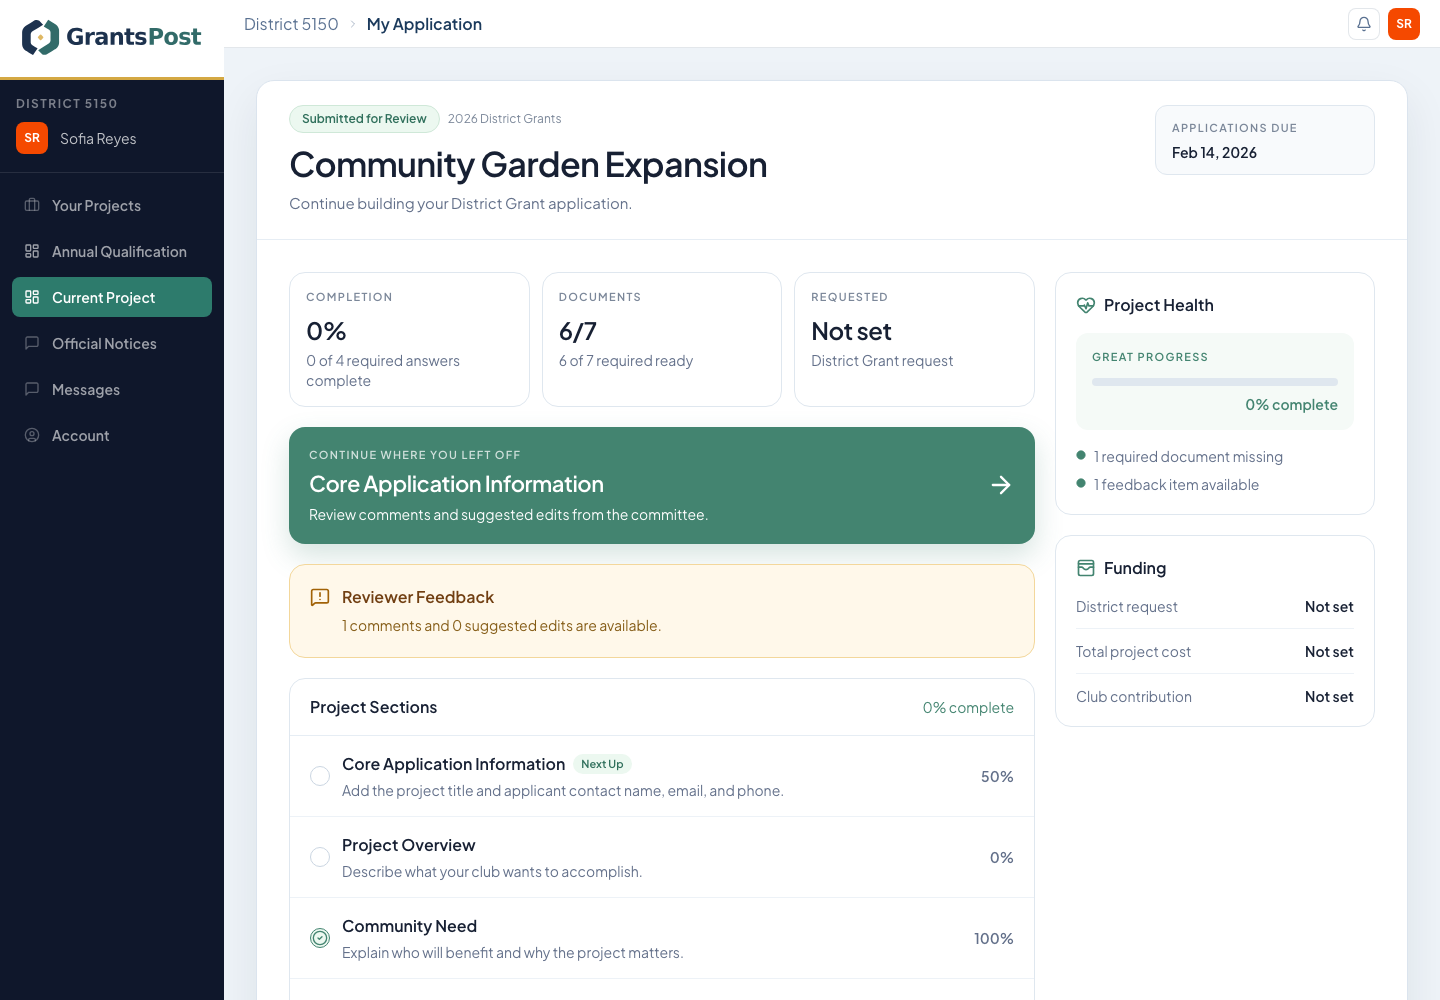
Where to beginFrom Your Projects, open the project that needs attention.
  1. Enter the project title, applicant contact, and other starting information.
  2. Save the starting information.
  3. Follow the project menu from top to bottom. Save each section before moving on.
GrantsPost screen for Start the project

Select the screen to enlarge it. Example data is fictional.

You are finished when

The project has a clear title and the first application section is available.

What happens next

Return to your role's home page and follow the next action shown by GrantsPost.

If something is not working

Use Help or Ask for help. Include the page name and what you were trying to do. Never send your password.

5

Describe the project

In your project, open Project Overview.
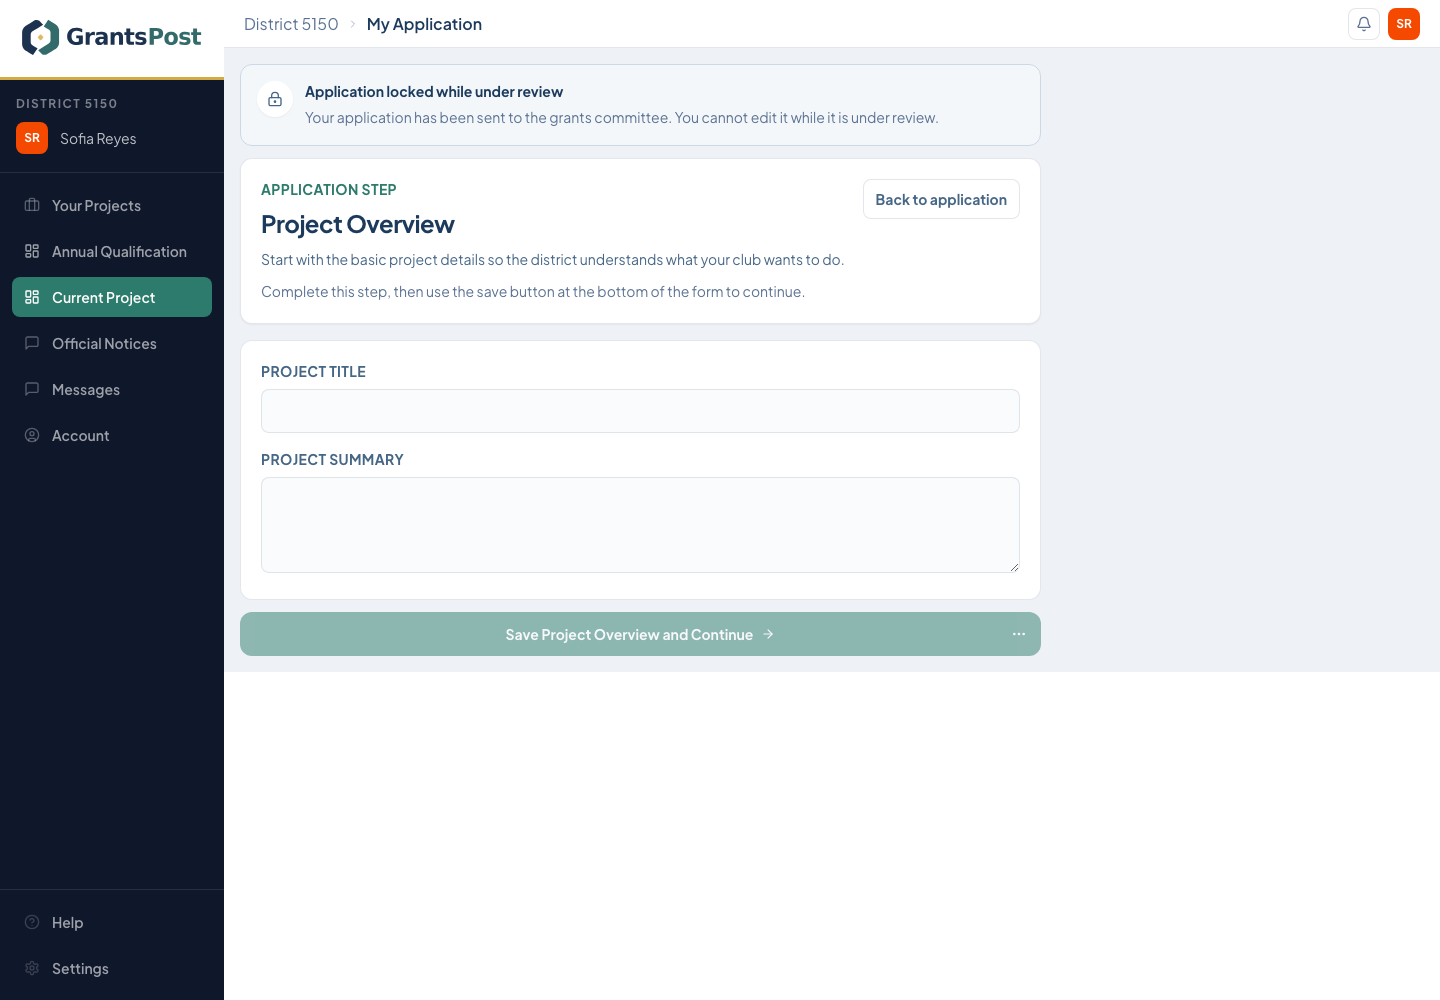
Where to beginIn your project, open Project Overview.
  1. Enter the project title, location, Project Period, project type, and amount requested. The Project Period may continue after the Grant Cycle closes.
  2. Check that these details match the budget and supporting documents.
  3. Select Save Project Overview and Continue.
GrantsPost screen for Describe the project

Select the screen to enlarge it. Example data is fictional.

You are finished when

Every required overview field is complete and saved.

What happens next

Return to your role's home page and follow the next action shown by GrantsPost.

If something is not working

Use Help or Ask for help. Include the page name and what you were trying to do. Never send your password.

6

Explain the community need

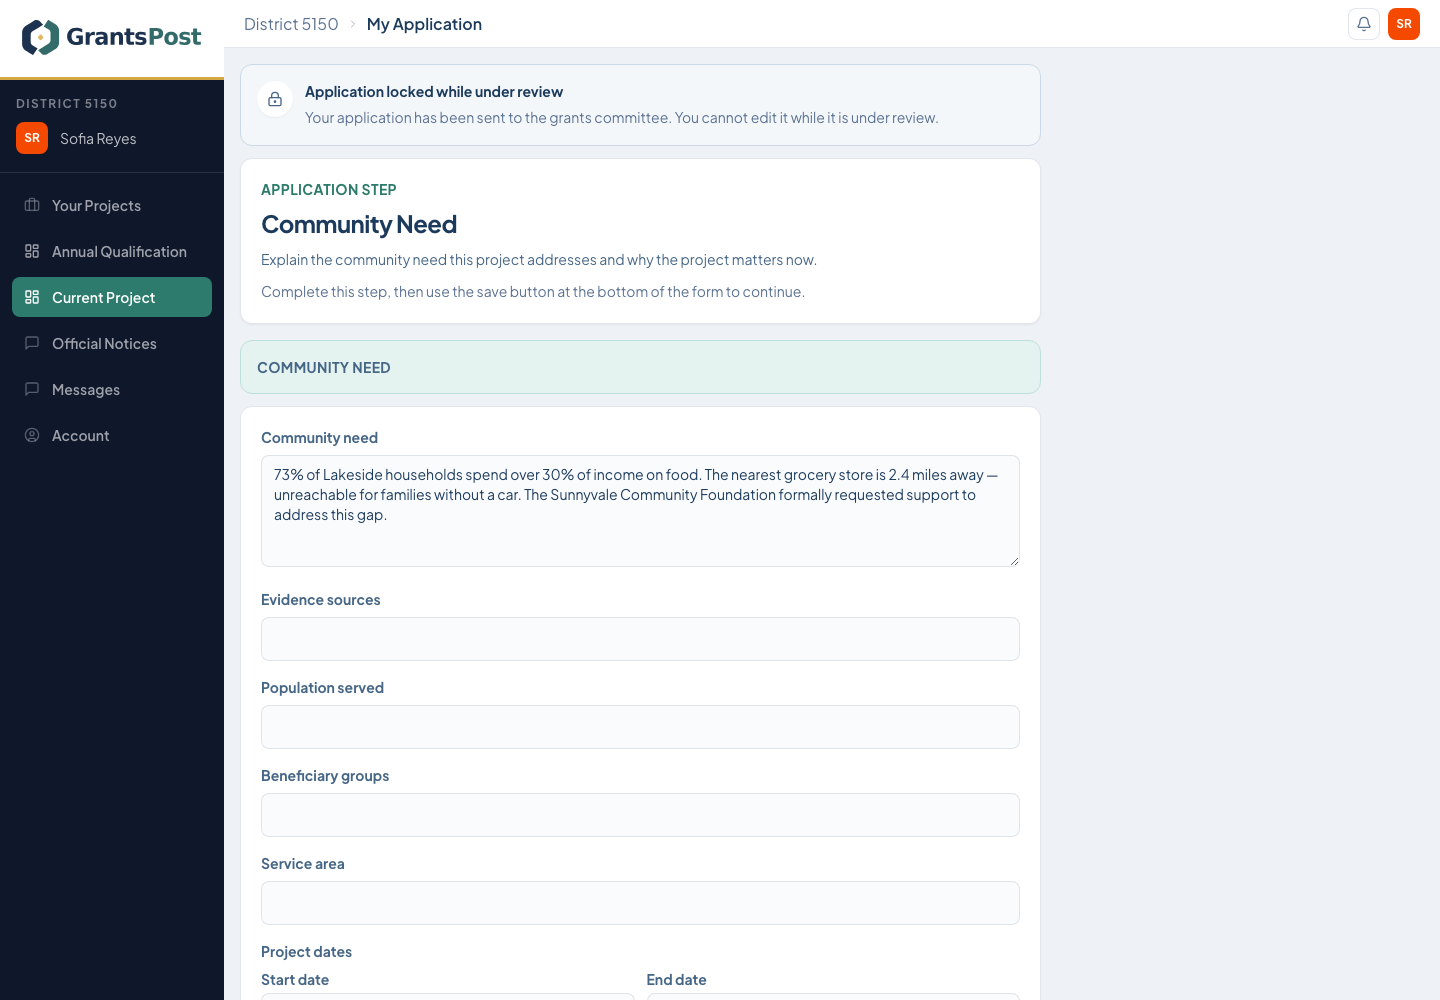
In your project, open Community Need.

Where to beginIn your project, open Community Need.
  1. Describe the need, who is affected, and the evidence that supports the need.
  2. Explain the planned activities, expected benefit, and how the work will continue.
  3. Select Save Community Need and Continue.
GrantsPost screen for Explain the community need

Select the screen to enlarge it. Example data is fictional.

You are finished when

A reviewer can understand why the project matters and how it will help.

What happens next

Return to your role's home page and follow the next action shown by GrantsPost.

If something is not working

Use Help or Ask for help. Include the page name and what you were trying to do. Never send your password.

7

Build a balanced budget

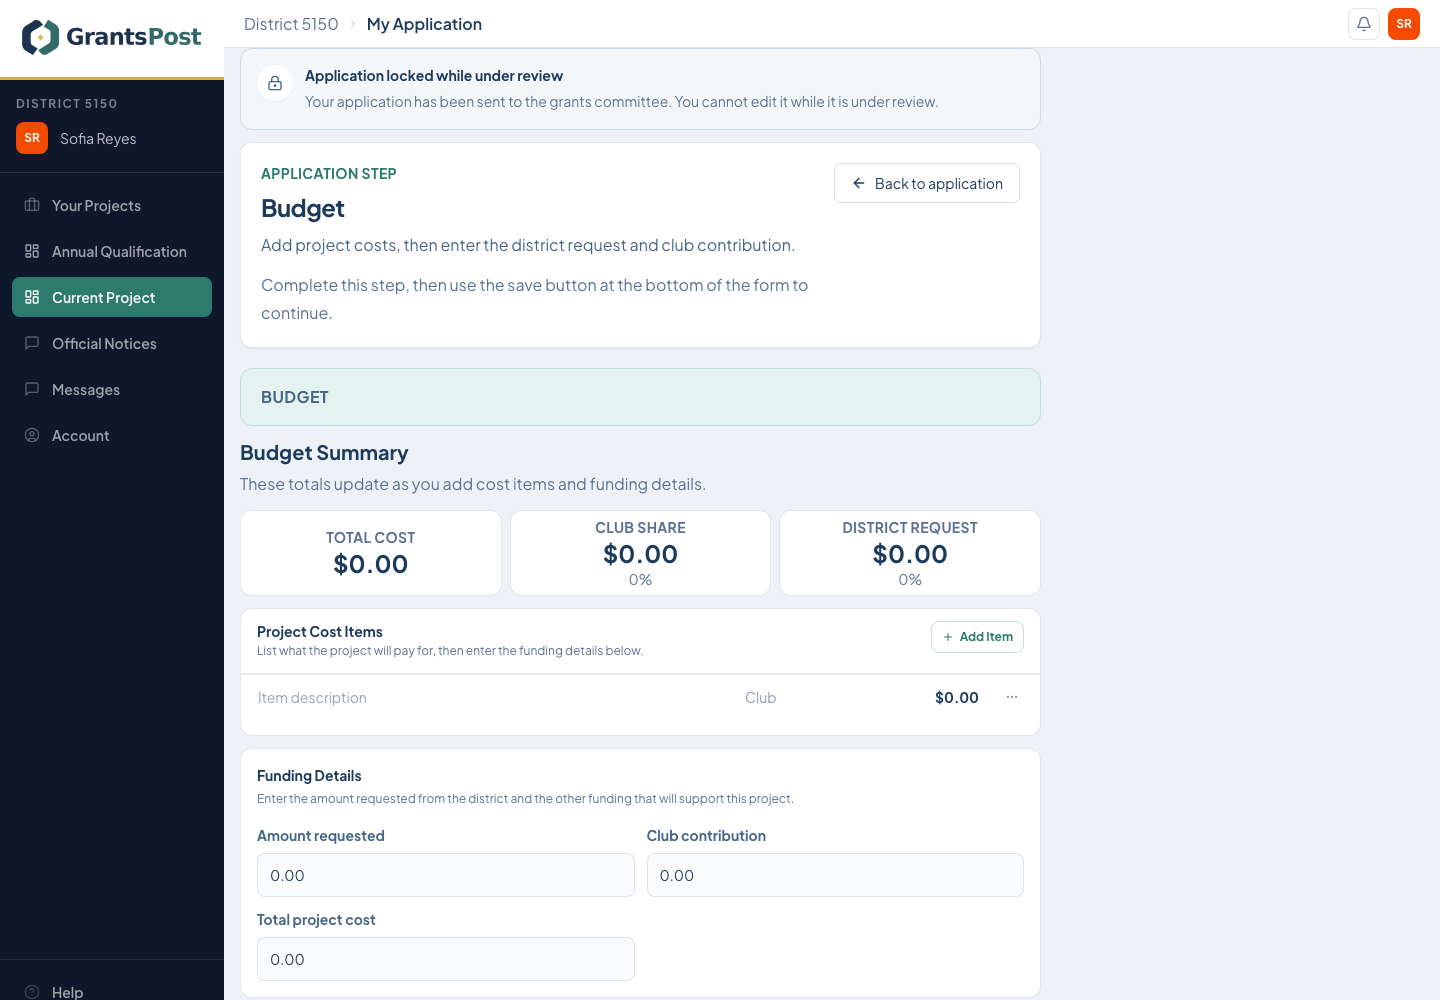
In your project, open Budget.

Where to beginIn your project, open Budget.
  1. Add every project expense and funding source.
  2. Check that total funding equals total expenses and that the grant request is within the limit shown.
  3. Select Save Budget and Continue.
GrantsPost screen for Build a balanced budget

Select the screen to enlarge it. Example data is fictional.

You are finished when

The budget balances and stays within the configured request limit.

What happens next

Return to your role's home page and follow the next action shown by GrantsPost.

If something is not working

If the budget will not save, check that funding equals expenses and the request is within the displayed limit.

8

Upload documents

In your project, open Documents.

Where to beginIn your project, open Documents.
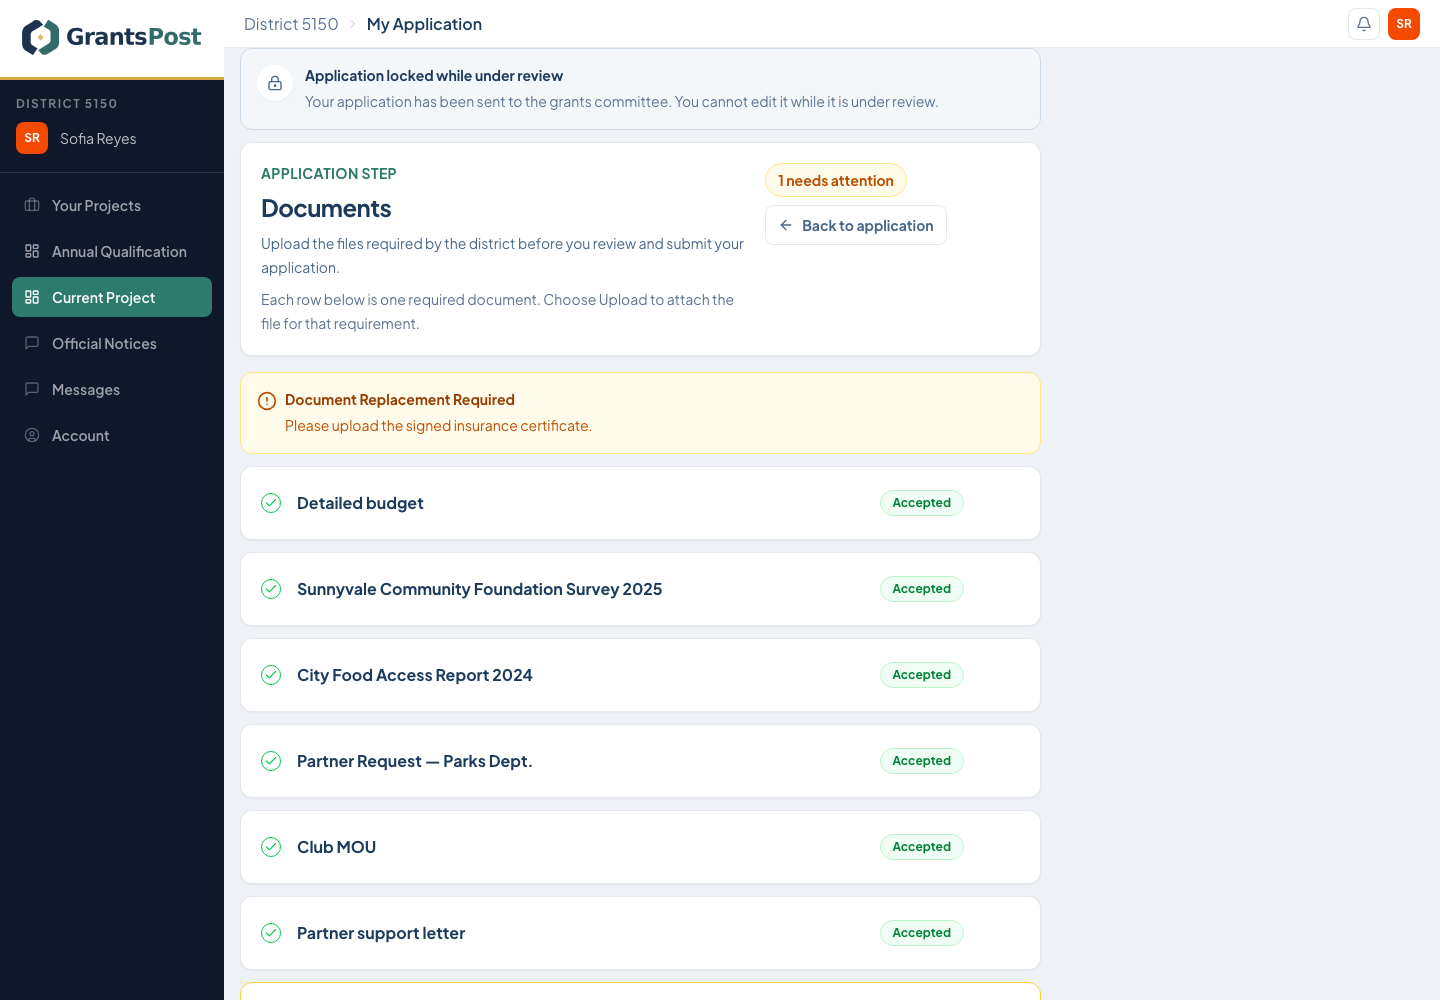
  1. For each item marked Required, select Upload.
  2. Choose the correct file and wait until its status shows that the upload finished.
  3. If the wrong file was added, select Replace and upload the correct one.
GrantsPost screen for Upload documents

Select the screen to enlarge it. Example data is fictional.

You are finished when

Every required document shows as ready.

What happens next

Return to your role's home page and follow the next action shown by GrantsPost.

If something is not working

If upload fails, check the allowed file type and size shown beside the requirement.

9

Set outcomes and measures

In your project, open Outcomes and measures.
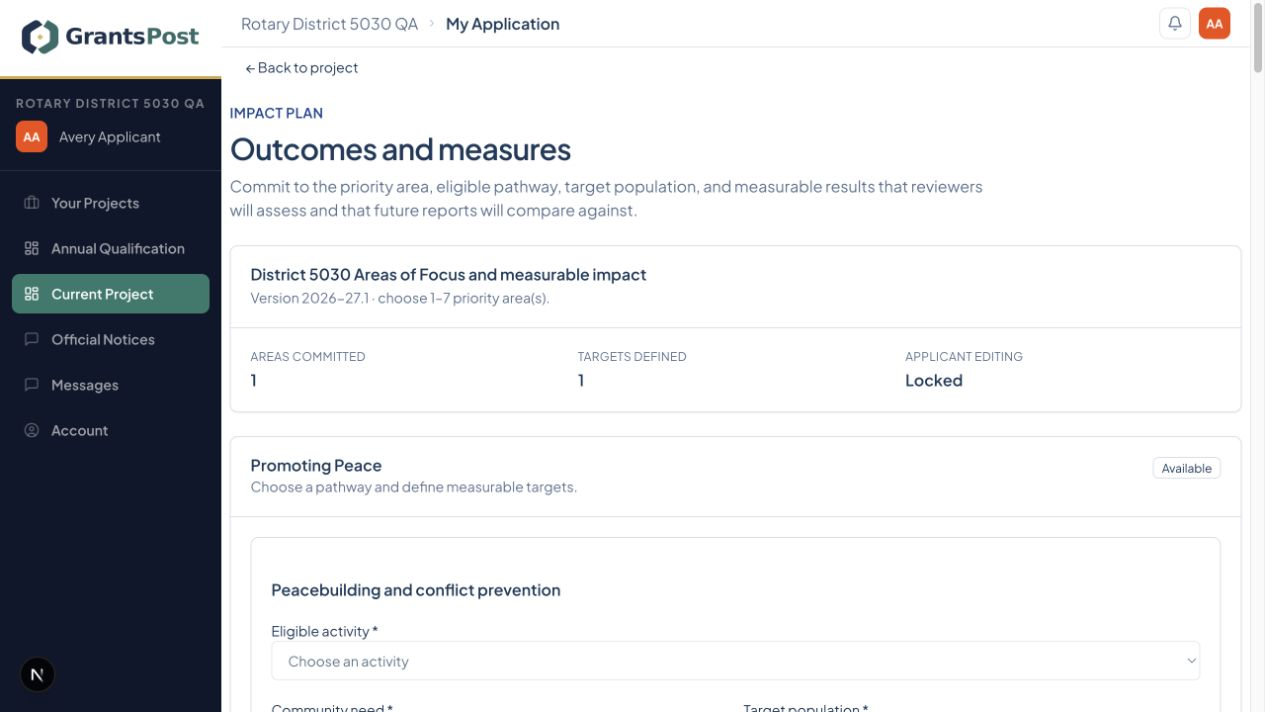
Where to beginIn your project, open Outcomes and measures.
  1. Choose the priority area and enter the number of people expected to benefit.
  2. Add a measurable target and explain how you will measure it.
  3. Save the section and confirm the target matches the project plan.
GrantsPost screen for Set outcomes and measures

Select the screen to enlarge it. Example data is fictional.

You are finished when

The project has measurable targets that match the application narrative.

What happens next

Return to your role's home page and follow the next action shown by GrantsPost.

If something is not working

Use Help or Ask for help. Include the page name and what you were trying to do. Never send your password.

10

Review and submit

In your project, open Review & Submit.
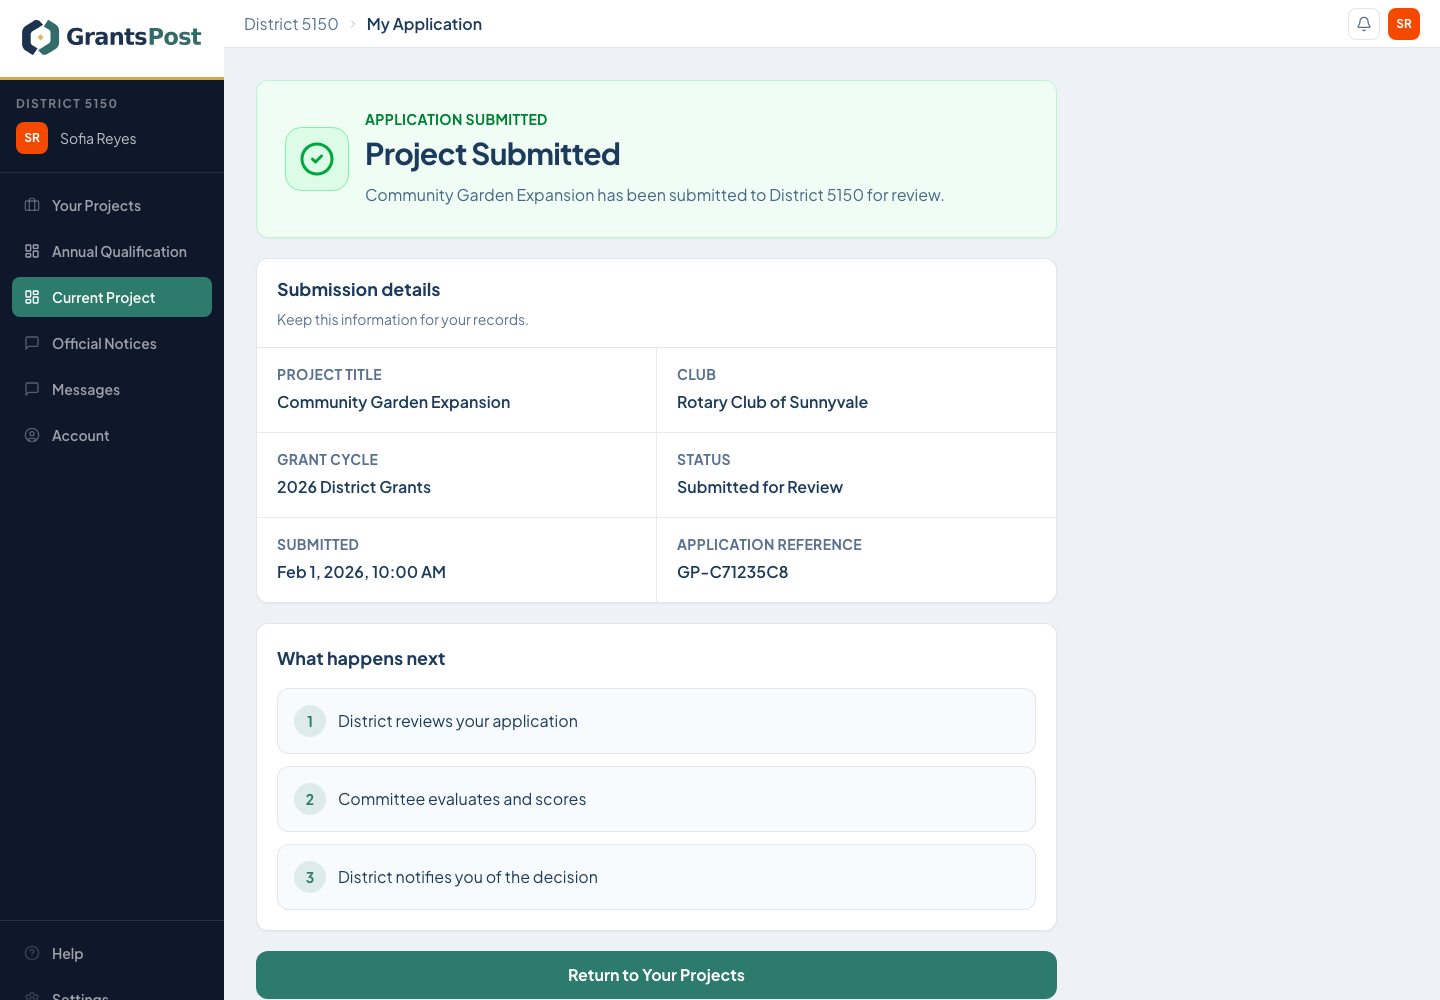
Where to beginIn your project, open Review & Submit.
  1. Open every item marked Needs attention and correct it.
  2. Preview the application and check names, dates, amounts, documents, and signatures.
  3. When all checks pass, select Submit for committee review.
GrantsPost screen for Review and submit

Select the screen to enlarge it. Example data is fictional.

You are finished when

The confirmation says the application was submitted and no editing controls remain.

What happens next

The submitted application becomes read-only and moves to preliminary or committee review.

If something is not working

Select the first Needs attention item. GrantsPost will take you to the section that must be corrected.

11

Respond to preliminary review

Open Your Projects, select the project, then open the preliminary review request.

Where to beginOpen Your Projects, select the project, then open the preliminary review request.
  1. Read each question and the reviewer's instructions.
  2. Enter a direct answer. If a file was requested, select Upload and attach only the requested file.
  3. Submit the response shown on the page. Your application stays read-only during this step.
Action path
Open requestAnswer each itemUpload requested file if neededSubmit response

You are finished when

Every open question has a clear response and each requested file is attached.

What happens next

The primary reviewer reviews your response and may resolve it or ask a follow-up question.

If something is not working

Use Help or Ask for help. Include the page name and what you were trying to do. Never send your password.

12

Accept the award and confirm receipt

Open your awarded project, then Accept award and receive funds.
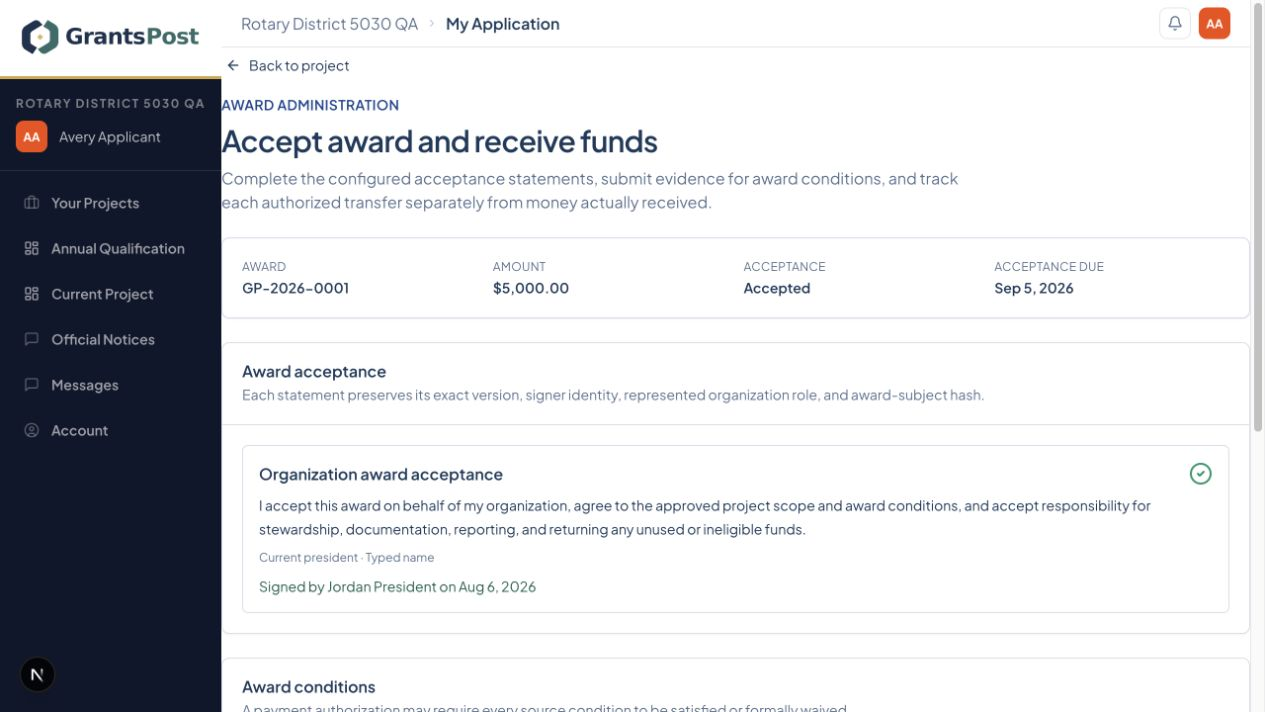
Where to beginOpen your awarded project, then Accept award and receive funds.
  1. Read the award amount, conditions, due date, and acceptance statement.
  2. The authorized officer completes the acceptance action shown on the page.
  3. Select Confirm receipt only after the money has reached the club's account.
GrantsPost screen for Accept the award and confirm receipt

Select the screen to enlarge it. Example data is fictional.

You are finished when

The award shows accepted and the received amount is recorded.

What happens next

The district can track the confirmed receipt and the project can begin under the award conditions.

If something is not working

Use Help or Ask for help. Include the page name and what you were trying to do. Never send your password.

13

Maintain project finances

Open your awarded project, then Project finances.
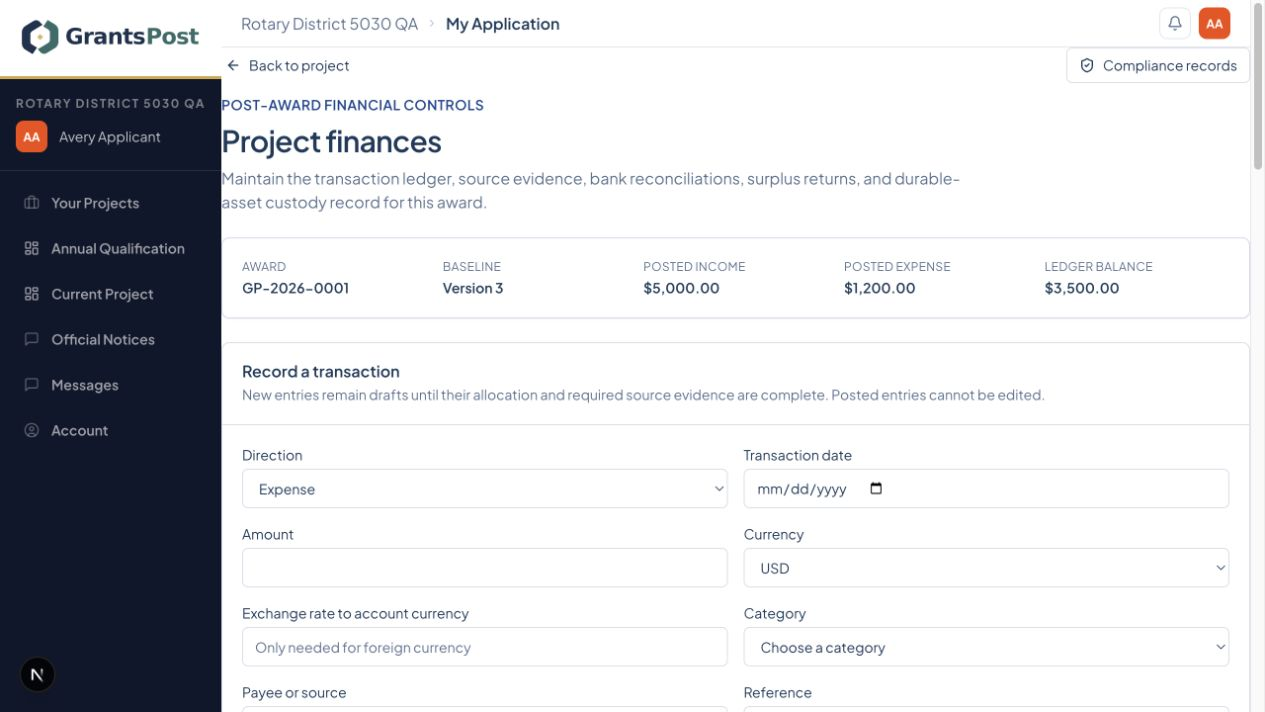
Where to beginOpen your awarded project, then Project finances.
  1. Add each income or expense with its date, amount, category, payee or source, and reference.
  2. Upload the receipt or other evidence when required.
  3. Save the entry and complete the reconciliation steps shown by your district.
GrantsPost screen for Maintain project finances

Select the screen to enlarge it. Example data is fictional.

You are finished when

The project account agrees with the supporting records and bank statement.

What happens next

Return to your role's home page and follow the next action shown by GrantsPost.

If something is not working

Use Help or Ask for help. Include the page name and what you were trying to do. Never send your password.

14

Request a project change

Open your awarded project, then Project changes.
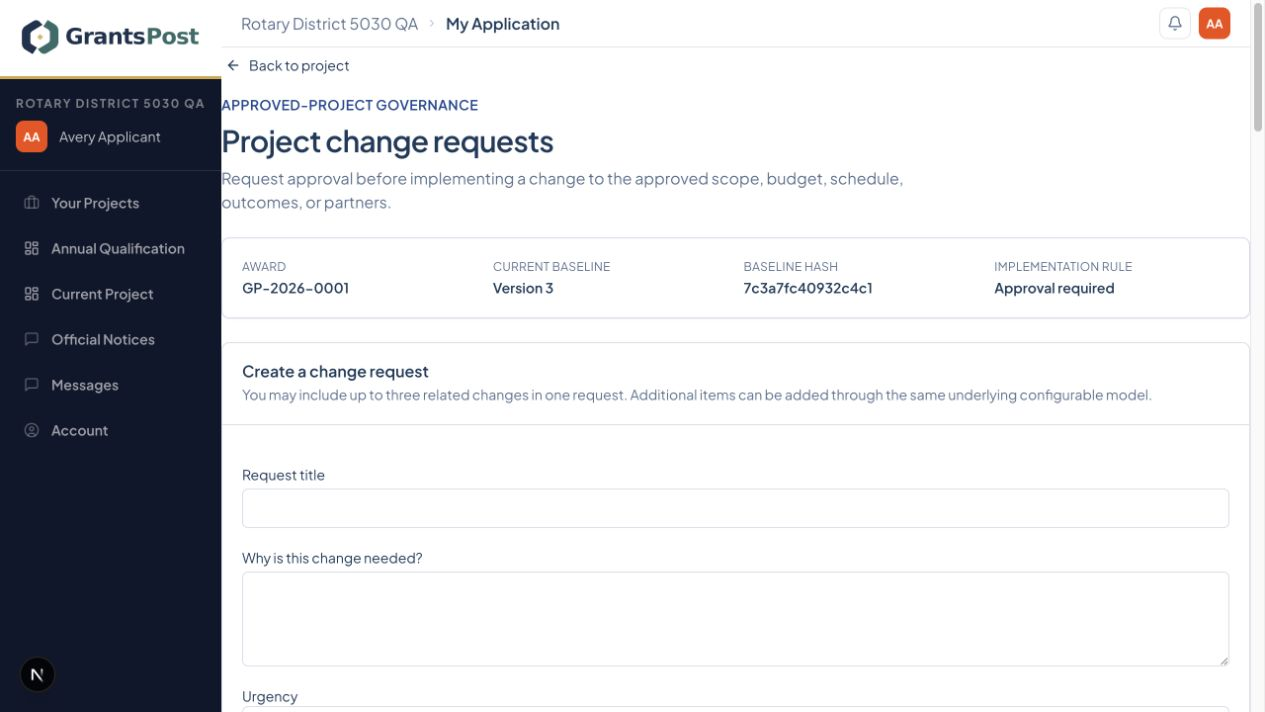
Where to beginOpen your awarded project, then Project changes.
  1. Enter a short title and explain what needs to change and why.
  2. Add the affected scope, budget, schedule, outcome, or partner item.
  3. Save the request, review it, then select Submit for approval. Do not make the change until it is approved when prior approval is required.
GrantsPost screen for Request a project change

Select the screen to enlarge it. Example data is fictional.

You are finished when

The request has a recorded decision and the approved project plan is updated when needed.

What happens next

Return to your role's home page and follow the next action shown by GrantsPost.

If something is not working

Use Help or Ask for help. Include the page name and what you were trying to do. Never send your password.

15

Complete and review the final report

From Your Projects, open the report marked Action needed.
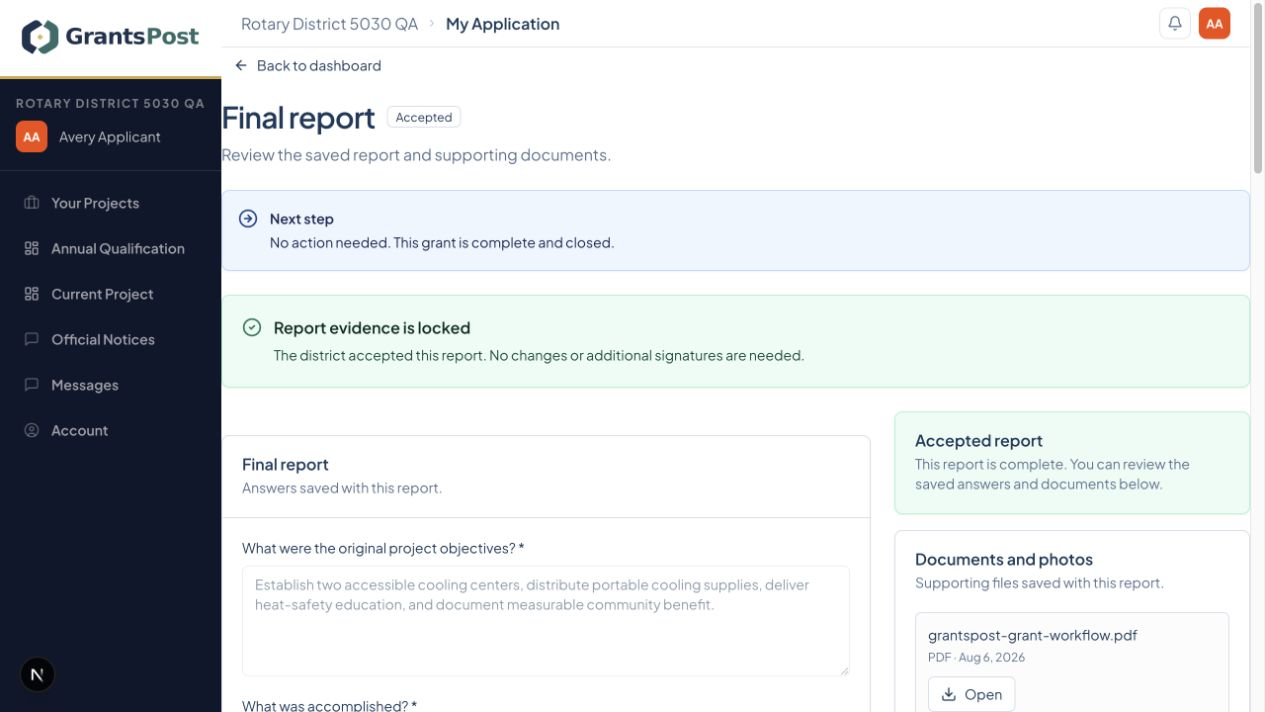
Where to beginFrom Your Projects, open the report marked Action needed.
  1. Open the awarded project and its report, even if the original Grant Cycle is already closed.
  2. Answer every report question and compare results with the approved project plan.
  3. Upload the required documents and complete the certification.
  4. Review the report, then select Submit report. If it is returned, correct only the requested items and submit again.
GrantsPost screen for Complete and review the final report

Select the screen to enlarge it. Example data is fictional.

You are finished when

The final report status is Accepted.

What happens next

A reviewer checks the submitted report and may accept it or return it for revision.

If something is not working

If Submit report is unavailable, open each required item marked Needs attention.

16

Return to a completed project

From Your Projects, open the completed project.
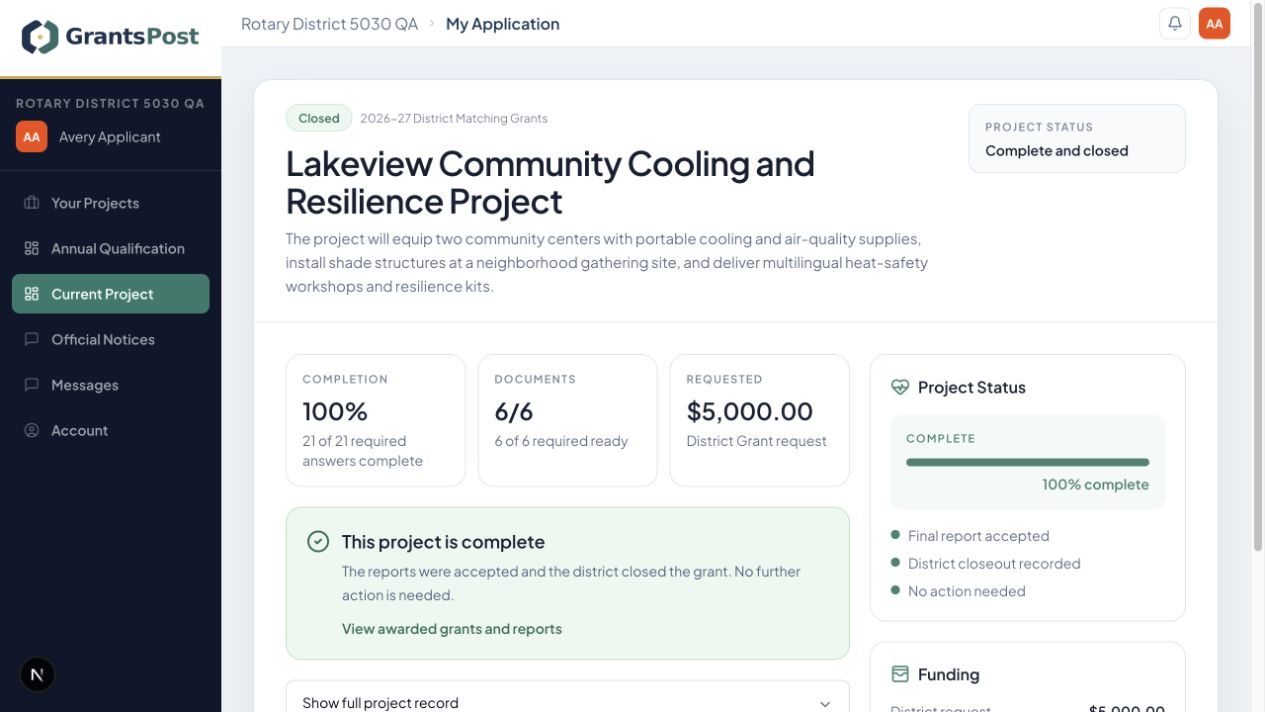
Where to beginFrom Your Projects, open the completed project.
  1. Check that the project says Complete and closed and shows 100% completion.
  2. Open the project record only when you need to review past application, award, finance, or report information.
  3. No further action is needed unless your district contacts you.
GrantsPost screen for Return to a completed project

Select the screen to enlarge it. Example data is fictional.

You are finished when

The project clearly says that no further action is needed.

What happens next

Return to your role's home page and follow the next action shown by GrantsPost.

If something is not working

Use Help or Ask for help. Include the page name and what you were trying to do. Never send your password.

Screen example